
This guide will help you integrate eSUB with Sage 300. Your company’s eSUB Executive Administrator (see eSUB User Levels) may follow the steps below to set up eSUB Timecard Management. You may also export payroll data from eSUB to import into a third-party financial software package.
IMPORTANT: To get started, contact your Strategic Consultant or Client Success Manager to begin the process of creating the eSUB Time export/Sage import.
Setup within eSUB:
- Navigate to Start > Settings > Administration > Company Setup > Company Preferences > Accounting.
- Select the financial package: Sage 300 CRE (Connector), Sage 300 Timberline, or Sage 300 Timberline without Extras.
- Then select Save Data.

Time exporting process:
- Navigate to Timecard Management
- Make sure all time that you want to export has been approved
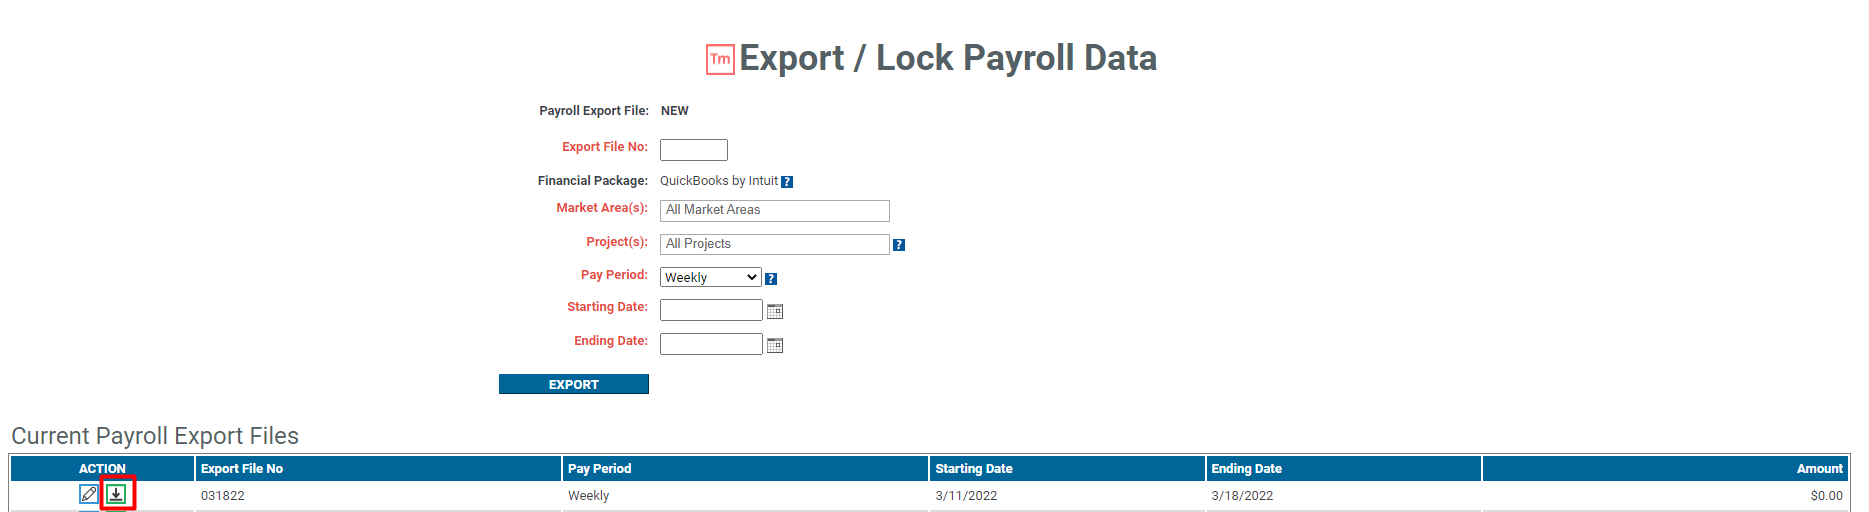
- In the Time dropdown menu, select Export Payroll Data
- Fill in the fields for Export File No., Starting Date, and Ending Date.
- Market Area and Projects will default to ‘All’.
- Select ‘Export’
- Click the down arrow icon next to the file you just created to download the payroll export file.
Setup Import in Sage 300:
You will need to setup a few things in Sage 300:
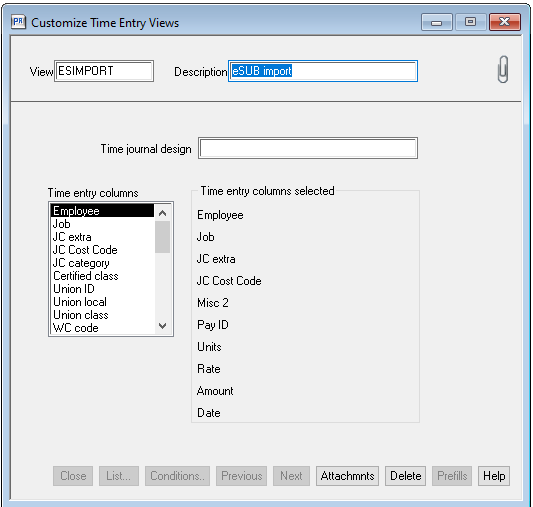
- Open Sage 300 and go to Tools > Customize Time Entry
- Under "View" create a new Time Entry called "ESUB" and enter in a description. This will tell Sage 300 in what order to export your data. Consult with your eSUB Strategic Consultant or Support to set up the correct column order depending on your Financial Package in Company Preferences.
- Follow the correct steps depending upon which Sage 300 platform you are using:
- If using either Sage 300 CRE (Connector) with Timecard Export to include extras enabled or Sage 300 Timberline financial package options, use the following selections in this exact order:
- Employee
- Job
- JC Extra
- JC Cost Code
- Misc 2
- Pay ID
- Units
- Rate
- Amount
- Date
- If using either Sage 300 CRE (Connector) with Timecard Export to include extras enabled or Sage 300 Timberline financial package options, use the following selections in this exact order:
-
- If using either Sage 300 CRE (Connector) without the Timecard export to include extras enable or Sage 300 Timberline without extras financial package options, use the following selection in this exact order:
- Employee
- Job
- JC Cost Code
- Misc 2
- Pay ID
- Units
- Date
- If using either Sage 300 CRE (Connector) without the Timecard export to include extras enable or Sage 300 Timberline without extras financial package options, use the following selection in this exact order:
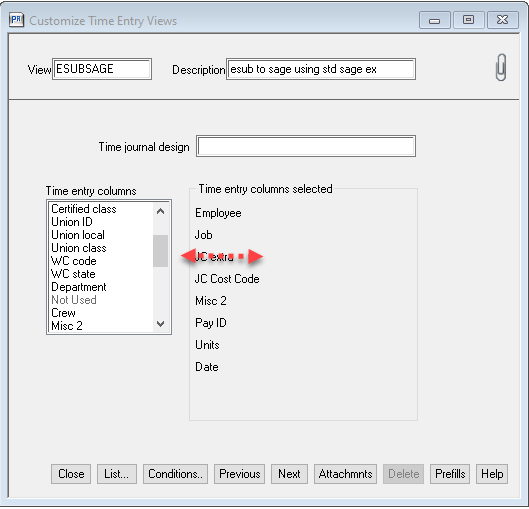
Select the correct column name from the "Time Entry Column" list on the left-hand side to add them to the Time Entry View you're setting up on the right-hand side and Save and Close your new Time Entry View.
Importing Time:
- Open Sage 300 and go to Tools > Import Time.
- Click "List" from the import time selection and select the eSUB exported payroll file from your desktop containing the approved exported hours. You must also select an error file as well. Again click "List" and create a new file titled "Error" and save.
- Enter "eSUB" under Time Entry View, enter the period start and period end date and click "Start" to begin import.
- Open the task bar to view import status. Any errors will be exported to the error file you setup.
Review imported time:
- Go to Tasks
- Change Time Entries
- Change Unposted Time
- Recently imported time will be in the table
Comments
0 comments
Please sign in to leave a comment.