
Overview
An eSUB Time User is a user that has been granted access to utilization of the eSUB Time mobile app and eSUB Time web interface. eSUB Time users may either an eSUB Time Only user, or they may be a normal eSUB user with access to other eSUB Project Management and Corporate Management modules in addition to eSUB Time.
In order to be an eSUB Time user, a profile for the employee must be set up on the Employee Log page. An Administrator or higher user level can approach creation of eSUB Time users in one of two ways:
- Grant an existing eSUB Employee or User access to eSUB Time
- Create a profile for the new eSUB Time employee/user
| Table of Contents |
Add an eSUB Time employee/user
A user level of Administrator or higher is required.
Related Articles: User Level Access Breakdown
NOTE: If there are multiple employees that need to be invited to eSUB Time, try the steps in the Batch Invitation section
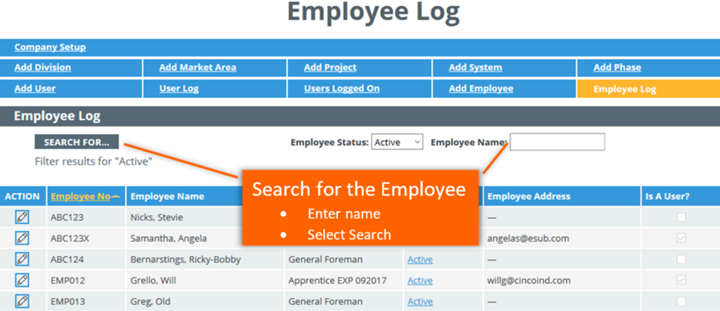
- Go to Start > Settings > Administration > Employee Log
- Search for the employee/user in the Employee Log and follow the steps based on the scenario:
| Employee already exists in the Employee Log | Employee does not yet exist in the Employee Log |
|
|
Check the Add Employee to Time box, and follow the steps based on the scenario:  |
|
| A user profile already exists for the employee | A user profile does not yet exist for the employee |
|
|
- (Optional) Add the employee/user to projects by selecting the check box adjacent to the project in the project list
- Select Save and Invite when finished

Edit an eSUB Time employee/user
A user level of Administrator or higher is required.
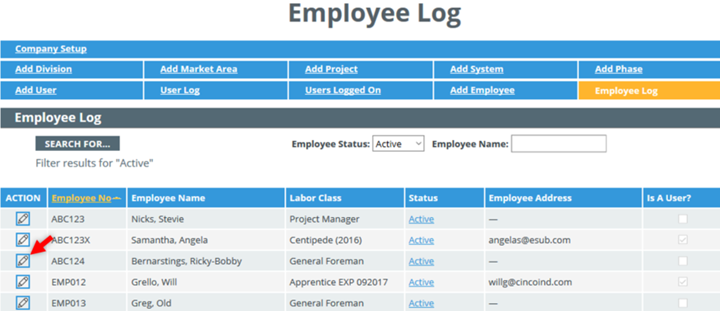
- Go to Start > Settings > Administration > Employee Log
- Select the Edit pencil icon
 on the Employee
- (Optional) Make changes to the fields as needed
- (Optional) Add the employee/user to projects by selecting the check box adjacent to the project in the project list
- Select Save Data when finished

User levels in eSUB determine what features a user has access to. The default user level options are:
- Time Only User (only available on accounts subscribed to eSUB Time)
- View User
- Field User I/II
- Project Manager
- Administrator
- Corporate Administrator
- Executive Administrator
A Time Only user may only access the eSUB Time app, and the eSUB Time web interface.
Related Articles: User Level Access Breakdown
Invite employee(s) to use eSUB Time
The eSUB Time invitation is an automated email that new users of eSUB Time will receive once their profile is set up. The email contains information about eSUB Time, an invitation to download the application, and the employee/user’s login credentials.

Example 1: The eSUB Time invitation email.
A single employee can be invited to use eSUB Time at the time that their eSUB Time profile is created. See the steps in the Add eSUB Time employee/user section for instructions.
Batch invitations allow for multiple eSUB Time employees/users to be invited to eSUB Time at once, by matching existing employee profiles with existing user profiles. A user level of Administrator or higher is required.
- Go to Start > Settings > Administration > Employee Log
- Select the Edit pencil icon on any employee
- Select the Batch Update button

Add an employee/user to a project
There are two ways an employee/user can be added to a project:
- Through the Project Configuration page
- Through the Employee Log
Ensure that the employee/user has been added to eSUB Time before continuing (Jump to section: Add an eSUB Time employee/user).
A user level of Project Manager or higher is required.
From the Select Project page:
- Select the project
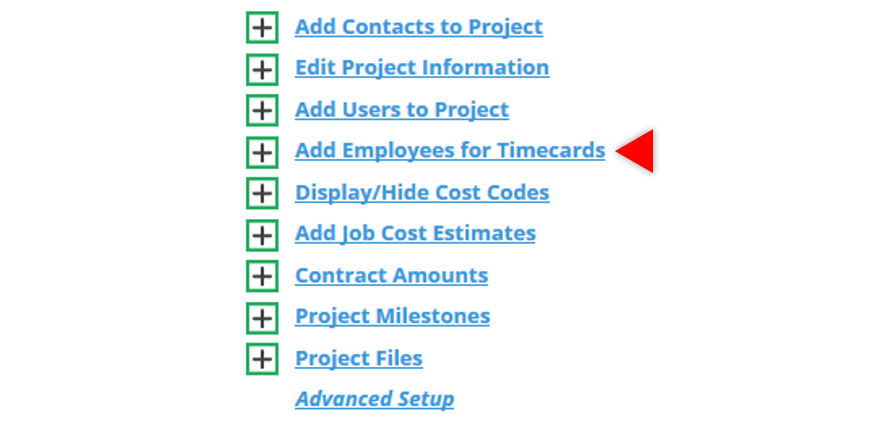
- Go to the Project menu > Configure Project
- Select Add Employees for Timecards
- Check the box adjacent to the employee’s name to add them to the project
- Select Save Data when finished

- Select the Manage Project link to leave project configuration
A user level of Administrator or higher is required.
- Go to Start > Settings > Administration > Employee Log
- Select the Edit pencil icon on any employee

- (Optional) Make changes to the fields as needed
- (Optional) Add the employee/user to projects by selecting the check box adjacent to the project
- Select Save Data when finished

Comments
0 comments
Please sign in to leave a comment.